
As we head towards Toby’s fourth birthday, and I consider how I am going to make the requested Numberblocks cake, I thought it would be the perfect time to share this post of how I made his monkey cake again.
I’d never made a cake with any sort of design on it before so when we decided to have a (sort of) party for Toby’s 1st birthday I took to Pinterest to find some inspiration for his cake. I was considering doing a spotty number one cake but decided I didn’t want to brave proper icing and would prefer something with buttercream. Then I saw a few monkey cakes – a perfect choice for my little monkey. I combined a couple of tutorials to come up with a monkey cake of my own…and this is how I did it…

Step 1: Make the cakes
I used a easy-peasy sponge recipe which I think I’ve mentioned on here before. All you need to do is weigh your eggs (shells on is fine) and then use an equal quantity of butter, castor sugar and self-raising flour. I used four eggs which gave me two 8 inch sandwich cakes and four large cupcakes (baked in a muffin tin). I also replaced 50g of the flour with cocoa powder and added a teaspoon of baking powder and a teaspoon of vanilla essence. I baked the cakes at 180° in a fan oven for about 30 minutes (I find times are never exact so you’ll need to check the cakes a few times towards the end of baking – they’re done when they start to come away from the sides of a tin and a skewer into to the middle of the cake comes out clean).
When they’re done, take them out of the tins and leave to cool.
Step 2: Make the buttercream
You can do this while the cakes are cooling. I decided to go for chocolate and white chocolate buttercream for my monkey cake but you could use chocolate and vanilla. This would work equally well with those tubs of ready made buttercream you can buy if you didn’t want to make your own. I adapted a recipe from The Primrose Bakery Cookbook – I used their vanilla buttercream recipe then added double cream and a mixture of milk and dark chocolate to half (I was just going to use milk chocolate but the colour wasn’t dark enough) and white chocolate to the other half. The only downside to this recipe is that you need to keep your cake in the fridge or the buttercream will go off quickly.
Step 3: Assembly – face and ears
First, spread a layer of the white chocolate buttercream over one of the sandwich cakes, then place the other, upside down, on top. My cakes were fairly level but if yours aren’t you might want to level the tops using a bread knife.

Next, I cut the bottom off the four cupcakes and then sandwiched them together with the white chocolate buttercream. (I actually think you would be better using a small cake tin if you have one or making another big cake and using a cutter to cut out circles – that way they will be the same height as the main cake and they won’t be narrower in the middle like mine were).
Cut a semi-circle from each each so it can sit right up against the main cake.

Step 4: Coverage
Cover the whole cake, including the ears, with the chocolate buttercream. I started on the top then carefully covered the sides, smoothing it all out with a silicone spatula. When you have covered the whole cake, pop it in the fridge for half an hour. This will set the chocolate buttercream so it doesn’t mix with the white chocolate when you come to do the next step.
Step 5: Features
Use the white chocolate buttercream to cover the tops of the ears and make the face shape in the middle of the cake. I just used a small spatula and did it freehand.

Lastly, melt a small amount of chocolate and pipe the rest of the features (if you don’t have a piping bag just put the chocolate in a small sandwich bag and snip off the corner). I used Giant Chocolate Buttons for the eyes, stuck on with a bit of melted chocolate and also added mini marshmallows. My piping needs a bit of practice but I think it came out OK!
Step 6: Make a wish
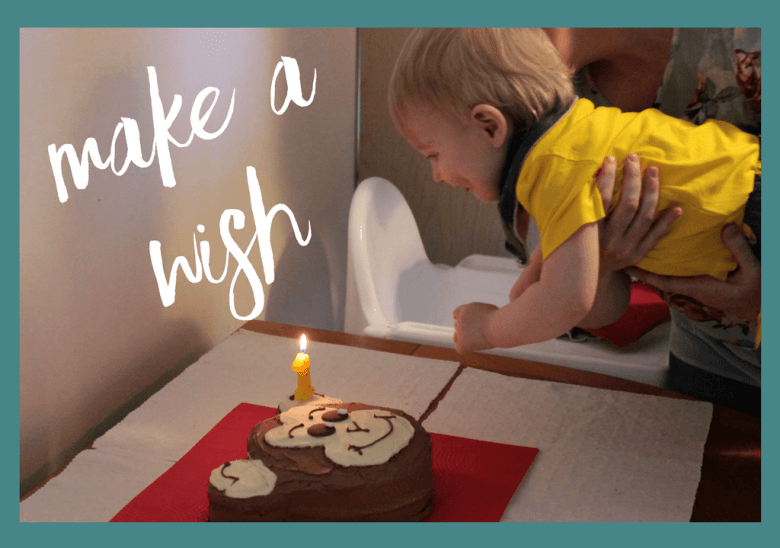
So OK, it’s not the most professional looking of cakes but I was really pleased with it and best of all…it tasted delicious!


I think that looks fantastic – so simple but incredibly effective and he certainly looks like he enjoyed it!
Thanks. You can do whatever shape you want when you have the basics. This would be even more fun with slightly older children since they can join in the fun of making. I would want a cake with fruit topings. We love fruits. I think, it wouldn’t be hard to design.
Great cake for kids birthdays…I remember I had a bear cake when I was little.
I remember this cake from first time around – I loved it then and love it now! I’ve never tried to make a birthday cake but you’ve done a great job and it looks like he loved it! Thanks for linking up 🙂 x
It looks delicious and it definitely looks like a fab monkey! I love the look on his face too, clearly loves his cake! 🙂 x
That is one super cake, it looks so professional!